我が老いたホンダのメインリレーを治してみました。
1. For better access, I removed the plastic panel underneath the passenger-side dashboard by removing 3 screws as indicated. The fourth lower-right screw is technically not holding the panel in place (it's holding a connector on the panel) but had to be loosened for the panel to come off (the screw is too long or something, in the way of the hinge underneath).
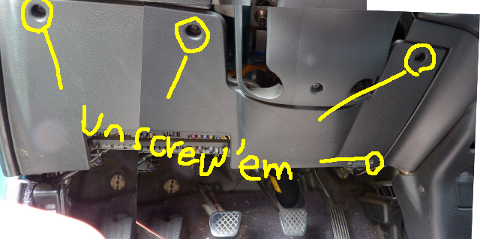
まず上部の3つのネジを外し、右下のネジを緩める。右下のネジはパネルの為ではないが外す際に引っかかるので、緩める必要あり。
2. The main relay is now visible to the left of fuse box, behind the open-hood lever. It's a gray box with a brown connector and is attached to the chassis of the car with a steel tab. Unbolt the (10-mm) bolt to detach the relay (and the tab) from the chassis.

メインリレーはヒューズボックスの左、ボンネットオープンレバーの奥。10mmのボルト。
3. After unbolted, the relay simply dangles. Disconnect the connectors by pulling jack and plug apart while pressing down the knob on the plug.

メインリレーのコネクタを外す。
3.Here's the close up of the relay assembly. I pressed a flat-head screwdriver against each of the latches to remove the cover.

取り出したメインリレーアセンブリ。マイナスドライバーを矢印のノブに押し当ててカバーを外す。
4. The exposed PCB. Several of the solder junctions are looking suspicious.

問題のプリント基板。いくつかはんだが甘くなっていそうな箇所発見。
READY TO WORK

5.After desoldering attempt. I sucked solder up just once per pad.

はんだ吸取器使用後。もう一度はんだづけするので、完全にはんだをとる必要は無し。
6. After resoldering. Perhaps not MIL-SPEC good but it looks better than the original. Skipping cleaning process as I do not have any PCB cleaner.

再はんだづけ後の基盤。まあ久しぶりにしてはまずまずの出来かな。少し汚いが良しとする。
7. Putting everything back. Reversing Step 3 down to Step 1.
カバーをかぶせ、ユニットを車に再装着、化粧パネルを戻す。
And the car STARTED! Of couse, this was not the for-sure sign of success as the symptom only manifests itself in a hot weather. It was pretty nice in the morning today. I'll have my fingers crossed and test it when it gets hotter.
で、エンジン無事かかった。でもかからなくなるのは夏の暑い日なので何ヶ月かは調子見。