Wednesday, March 16, 2011

VFD & USB-to-UART Module

ここ(昔お世話になった方のブログ)でこんなものを発見。

My old over-the-internet Japanese acquaintance (whom I was grateful to hear his safety after the earthquake) posted a blog entry on using this USB-to-UART module (essentially an FTDI FT232R evaluation module):

In the U.S., we can get this little PCB piece from Mouser for $17.50 a piece. This looks a lot more appealing than other offerings such as this or this.

このモジュールの用途は前面パネルのVFD(蛍光表示管)を元の(Fig.A)からNoritakeの(Fig.B)に変える予定。このVFDモジュール(GU280X16G)CMOS 又は RS-232のインターフェースオプションがあるがCMOSの方を購入予定。(USBでPCに直接繋ぐか、インターフェースコントロール用のMCUを介して繋ぐかのオプションが出来るから。)

This module can be used to interface a Noritake VFD (Fig. B, which is to replace the original shown in Fig. A) with PC. There are 2 interface options for this VFD (GU280X16G): CMOS or RS-232. My plan is to go with the CMOS route so it can be connected to the PC directly (via USB module above) or indirectly via a microcontroller which checks the front-panel inputs (buttons & IR remote) even when the PC is off (more on this later).
Fig. A. Original VFD.

Fig. B. Noritake VFD.

Saturday, March 12, 2011

Car Fixin'

Armed with soldering tools, today I tackled the main-relay repair of my '93 Honda Civic according to Honda Acura E R.

我が老いたホンダのメインリレーを治してみました。

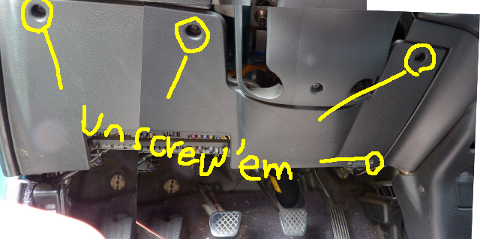
1. For better access, I removed the plastic panel underneath the passenger-side dashboard by removing 3 screws as indicated. The fourth lower-right screw is technically not holding the panel in place (it's holding a connector on the panel) but had to be loosened for the panel to come off (the screw is too long or something, in the way of the hinge underneath).


まず上部の3つのネジを外し、右下のネジを緩める。右下のネジはパネルの為ではないが外す際に引っかかるので、緩める必要あり。

2. The main relay is now visible to the left of fuse box, behind the open-hood lever. It's a gray box with a brown connector and is attached to the chassis of the car with a steel tab. Unbolt the (10-mm) bolt to detach the relay (and the tab) from the chassis.


メインリレーはヒューズボックスの左、ボンネットオープンレバーの奥。10mmのボルト。

3. After unbolted, the relay simply dangles. Disconnect the connectors by pulling jack and plug apart while pressing down the knob on the plug.


メインリレーのコネクタを外す。

3.Here's the close up of the relay assembly. I pressed a flat-head screwdriver against each of the latches to remove the cover.


取り出したメインリレーアセンブリ。マイナスドライバーを矢印のノブに押し当ててカバーを外す。

4. The exposed PCB. Several of the solder junctions are looking suspicious.


問題のプリント基板。いくつかはんだが甘くなっていそうな箇所発見。

READY TO WORK


5.After desoldering attempt. I sucked solder up just once per pad.


はんだ吸取器使用後。もう一度はんだづけするので、完全にはんだをとる必要は無し。
6. After resoldering. Perhaps not MIL-SPEC good but it looks better than the original. Skipping cleaning process as I do not have any PCB cleaner.


再はんだづけ後の基盤。まあ久しぶりにしてはまずまずの出来かな。少し汚いが良しとする。

7. Putting everything back. Reversing Step 3 down to Step 1.

カバーをかぶせ、ユニットを車に再装着、化粧パネルを戻す。

And the car STARTED! Of couse, this was not the for-sure sign of success as the symptom only manifests itself in a hot weather. It was pretty nice in the morning today. I'll have my fingers crossed and test it when it gets hotter.

で、エンジン無事かかった。でもかからなくなるのは夏の暑い日なので何ヶ月かは調子見。

Wednesday, March 9, 2011

Soldering Gear

Among several tools that I need for the project, I purchased soldering tools first:
I will be soldering for the front panel interface.

Actually, they will be used first to fix my car. My '93 Honda Civic (bought brand new in high school, thanks to my family moving back to Japan) is showing an age. Ever since we moved down to Louisiana in 2007 my car has been refusing to start (engine cranks but won't start) in hot weather under sun. And Louisiana gets pretty hot humid during June-Sept. It starts fine in the morning, but would not start in the afternoon... I've shown it to a couple mechanics, and neither had any idea of why. So, it happened again this past week (we get nice 80°F+ weather in early March) so I actually did a web search and found a website called Honda Acura E R. And whaddayaknow, its front page says "Main Relay Problem and Other Intermittent Starting Problems and Solutions." Ha, so it's not just me and my car, it's a common problem with Honda.

So, I studied the website a bit and concluded that I can fix it myself with a soldering iron and I need to get it anyway! So, I'll be working on this, too.

Sunday, March 6, 2011

INTEC275 PC: Power Supply Options

Moving on to the power supply (PSU) considerations.

Again, the issue is the space space space. Assuming that I'll use a Mini-ITX motherboard (170 x 170 mm), PSU must be smaller than 100 x 79 x 308 mm... Most certainly a full-size ATX PSU is out.

There are basically 2 choices: Flex-ATX PSU or DC-to-DC converter with an external brick.

Flex-ATX PSUs (best known to be on Shuttle's XPCs) comes in the basic dimension of 150 x 81.5 x 40.3 mm (base model; there are longer models to accommodate higher output power). It cannot come in better dimension than this!

We don't need a lot of power, (Someone over at AVS Forum throwing 50 W as the power consumption for a Zacate-based HTPC.) But we want silence and 2 SATA power connections. And, I found a perfect unit:

FSP120-50GNF 120W Single FANLESS FLEX ATX Server Power Supply
newegg


Now, there are 2 concerns. First, there seems to be two versions of this PSU: one with 8 4-pin Molex connectors and another with 2 SATA power connectors. I want the latter, but it's not certain which one a store carries...

Secondly, it comes with 20-pin motherboard connector (not more modern 24-pin version) and has no 4-pin ATX 12V connector. Most motherboards released so far requires both (Asrock board seems to be the only exception). Now, there are adapters for both of these connections, but it would be the best if I don't need to invest in them.

For DC-to-DC converter route, the most prevalent option seems to be the PicoPSUs from Mini-Box.com.


For an ordinary setup, PicoPSU is a nice compact option, but the height clearance might be a problem for INTEC275 PC as it has a good chance to be located underneath the optical drive. Other options includes the Molex 80W unit.

I'm leaning towards Flex-ATX PSU route, but motherboard power requirement must be reviewed carefully.


Wednesday, March 2, 2011

AvalonDock: Open-Source .NET Library

AvalonDock

I've been looking for a way to create a Windows app which has a bunch of dockable/floatable/tabbable panels, and this one might do it all for me.

Monday, February 28, 2011

AMD Fusion (Zacate+Hudson) ITX Motherboard List

The ideal CPU for the INTEC275 PC would be AMD's new Fusion (Zacate) APU. Here're the list of ITX motherboards that I found to date.

Make Model Price Form Factor
Asrock E350M1 $109.99@newegg.com Mini-ITX
Asrock E350M1/USB3 $119.90@newegg.com Mini-ITX
MSI E350IS-E45 $129.99@newegg.com Mini-ITX
MSI E350IA-E45 $139.99@newegg.com
$159.00@logicsupply.com
Mini-ITX
GIGABYTE GA-E350N-USB3 $149.99@newegg.com Mini-ITX
ASUS E35M1-I DELUXE $174.99@newegg.com* Mini-ITX
ECS HDC-I2 n/a Mini-ITX
ECS HDC-I2/E-240 n/a Mini-ITX
Jetway NC85-E350-LF$149.99@newegg.com Mini-ITX
Sapphire PURE Fusion Mini E350 $139.99@newegg.com Mini-ITX
Sapphire PURE White Fusion E350 $109.99@newegg.com Mini-ITX
FoxconnAHD1S n/a Mini-ITX

* Newegg took this mobo off its shelf as of 4/21/11 still listed on ASUS website though.

From my brief web search (see here) indicates that there are more to come. For example, Biostar and Zota have not released their Zacate/Hudson board. Yep, that's why I'm not in any hurry to make up my mind on motherboard :)

The concern of using one of these Mini-ITX boards is that the board (17cm x 17cm) extends enough so that the optical drive will cover up portion of the board. With < 79mm height of the case (even less between mobo and the drive), the motherboard heatsink may not fit under the drive. I will need to do more in depth assessment later.

In case that none of these motherboards are short enough, the alternative choices are
Make Model Price Form Factor
Intel D945GSEJT $99.95@logicsupply.com Mini-ITX
Via EPIA-N800 n/a Nano-ITX
Via EPIA-N700 n/a Nano-ITX
Via EPIA NX n/a Nano-ITX
Via EPIA NR n/a Nano-ITX

The Atom-based Intel board is a nice one. It's short (< 20 mm H). The combination of underpowered single-core Atom and GMA 950 graphics is a concern, but it may not be critical as I am not interested in 1080p video playback with this PC. Also, there are several people over on the AVS Forum already using this mobo for their HTPC with Marvell CrystalHD video decoder.

Via Nano-ITX boards have the ideal size (12mm  x 12mm) but they are not really geared towards multimedia (especially hi-def video playback). So, they will be the ultimate last resort when packaging completely falls apart.

The ideal scenario is for somebody to release Nano-ITX Fusion board... and I found this! It doesn't appear that they do business in the U.S., but I'm keeping my figures crossed someone in the U.S. will sell it (at a reasonable cost).

Update 4/21/11
Newly in-stock: Asrock USB3 version, Sapphire Pure White Fusion E350
Off the shelf: Asus E35M1-I DELUXE

INTEC275 PC 想定動作環境

オンキョーPC(INTEC275 PCとでも呼びましょうか)の動作条件。

やはり元がCDプレーヤーということで、そう格別高く想定しないし出来ない。やはり、シャーシの寸法が市販のMini-ITXのケース並の容積(特に高さ、ヒートシンクの選定に気をつけねば)しかないのが痛い。よって、PCのスペックは下記の条件を満たせれば良しとする。

  • メディアセンターのユーザインターフェースの感度が良好であること。
  • オーディオ再生(本当はサウンドカード付けたいが、スペースが絶対的に無いのでボツ)
  • DVD再生
  • マルチメディアサーバ機能
必要最小限のPCのコンポーネント(マザーボード、HDD、光学ディスクドライブ、DC-DCコンバータ)を如何にうまく配置出来るかが最初の肝になりそうだ。

でもって、一番の肝は元からのパネルの機能を完全に温存する事。C-722Mの前後のパネルの機能は下記の通り。

  • 前部パネル
    • CDのトレー
    • ボタン(8:Power・Eject・Play・Stop・Pause・Forward・Backward・Display)
    • Standby LED (スタンバイ時に点灯)
    • VFD (vacuum fluorescent display、蛍光表示管)
    • IR (赤外線)リモートのレシーバ
  • 後部パネル
    • オーディオ出力用RCA コネクタ(2、左右)
    • オンキョーRI 端子用3.5-mm モノラルミニジャック(2)
    • デジタルオーディオ端子 (光学/RCA、マザボによる)